How Crumbling Mortar Joints Between Your Roof and Walls Lead to Leaks in Mount Vernon Triangle
When water stains appear on your Mount Vernon Triangle ceiling near exterior walls, crumbling mortar joints are often the hidden culprit. These deteriorating connections between brick masonry and roofing materials create pathways for water infiltration that worsen with every freeze-thaw cycle in Washington DC’s humid climate. Washington DC Building Code.
Mortar joints in historic row houses typically fail after 50-70 years due to repeated expansion and contraction. In Mount Vernon Triangle’s dense urban environment, limited air circulation accelerates moisture retention in brick walls, making the problem more severe than in suburban areas. Navigating Historic Preservation Roofing Rules in Dupont Circle.
Early warning signs include white efflorescence crystals on exterior brick, peeling interior paint near ceiling corners, and small water spots that grow after heavy rain. These symptoms indicate water is already penetrating through degraded mortar joints and traveling along wall cavities. How to Get Your Roof Ready for a DC Winter in Chevy Chase.
The freeze-thaw cycle in DC winters causes trapped water to expand within mortar cracks, widening them each season. This creates a destructive pattern where minor deterioration becomes major structural damage within just 2-3 years if left unaddressed.
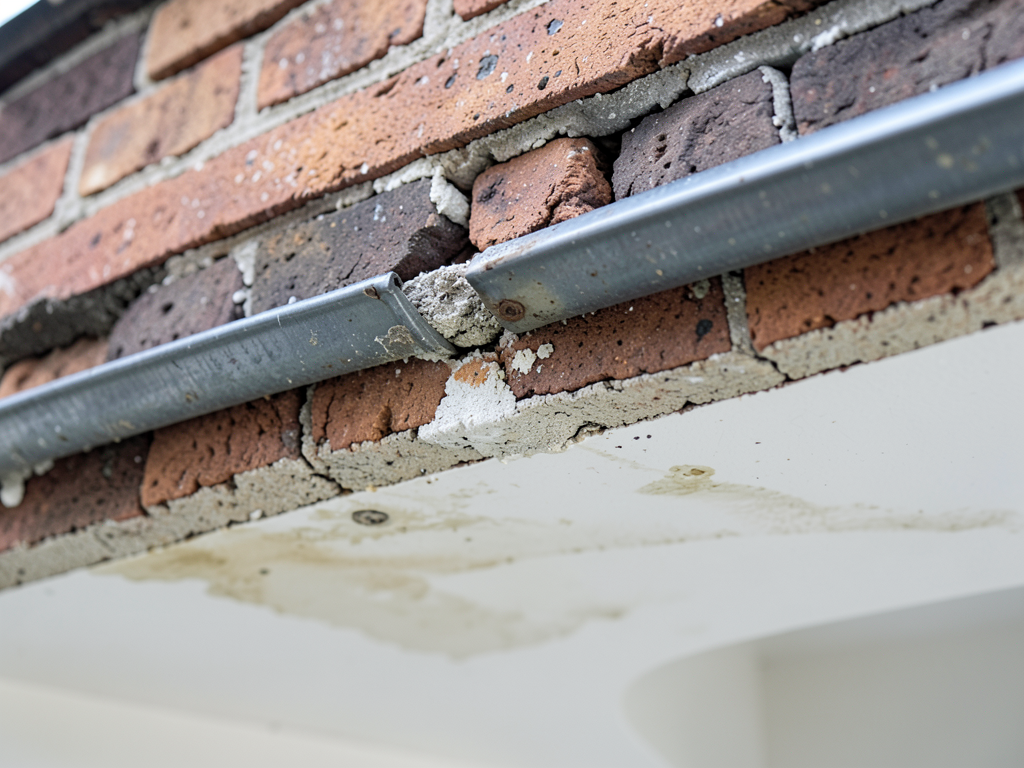
How Mortar Joints Fail at Roof-to-Wall Transitions
Mortar joints fail through a combination of age, weather exposure, and improper installation. The most vulnerable areas are where roof flashing meets brick walls, creating thermal movement that stresses mortar beyond its capacity.
Common failure patterns include vertical cracking along wall edges, horizontal separation where flashing should seal, and crumbling that leaves gaps large enough for water to pour through during storms. EPA WaterSense guidelines.
Water infiltration mechanics involve capillary action drawing moisture through hairline cracks, surface tension allowing water to bridge small gaps, and pressure differentials forcing water deeper into wall assemblies during wind-driven rain.
Step-by-Step Diagnostic Process for Mortar Joint Leaks
Professional diagnosis requires systematic inspection of both interior and exterior conditions. Start with a visual assessment of ceiling stains, then trace water patterns to their likely exterior source points.
Moisture meter readings at multiple wall heights help determine water migration patterns. Readings above 15% moisture content in interior drywall indicate active water intrusion requiring immediate attention.
Exterior inspection focuses on mortar joint width, depth of deterioration, and presence of efflorescence. Joints showing more than 1/4 inch of erosion typically need complete repointing rather than spot repairs.
Temperature differential testing with infrared cameras reveals hidden moisture pockets within wall cavities that aren’t visible to the naked eye, helping pinpoint exact leak sources.
- Exterior Visual Assessment
Examine all mortar joints for cracking, crumbling, or missing sections. Pay special attention to areas where roof lines meet walls.
- Interior Moisture Testing
Use a moisture meter to check drywall near suspected leak areas. Readings above 15% indicate active water intrusion.
- Efflorescence Check
Look for white salt deposits on exterior brick surfaces, indicating water is already moving through the masonry.
- Flashing Inspection
Verify that metal flashing is properly seated and sealed where it meets mortar joints. Look for gaps or corrosion. Metal Roof vs Asphalt Shingles Cost.
- Structural Assessment
Check for any bowing or shifting in brick walls that could stress mortar joints beyond normal limits.
Common Signs of Flashing Failure in DC Homes
Water stains on ceilings near exterior walls often indicate flashing problems rather than roof failures. These stains typically appear as irregular shapes following water travel paths through wall cavities.
Efflorescence on exterior brick surfaces shows water is already moving through mortar joints. The white, powdery deposits form when dissolved salts are carried to the surface by evaporating water.
Interior paint peeling near ceiling corners suggests moisture is accumulating behind walls. This moisture often originates from failed mortar joints allowing water to penetrate exterior surfaces.
Musty odors in upper floor rooms can indicate mold growth from chronic moisture exposure. These odors become noticeable when humidity levels remain elevated for extended periods.
Visible mortar deterioration includes cracking wider than 1/8 inch, crumbling that creates holes, and separation between brick courses. These conditions worsen rapidly during freeze-thaw cycles.
The DC Factor: Why Our Local Architecture is Prone to Leaks
Mount Vernon Triangle’s historic row houses present unique challenges for water management. These buildings often lack modern vapor barriers and rely on thick masonry walls that absorb moisture rather than shed it.
Washington DC’s climate creates ideal conditions for mortar joint failure. High humidity levels during summer months keep masonry saturated, while winter freeze-thaw cycles cause expansion damage to already weakened joints. The Real Cost of a Roof Replacement for Washington DC Homeowners.
Urban heat island effects in Mount Vernon Triangle create temperature differentials that stress building materials. Dark brick surfaces absorb heat during the day, then contract rapidly when temperatures drop at night.
Soil composition in the area affects foundation movement, which transfers stress to upper wall sections. Clay-heavy soils common in DC expand when wet and contract when dry, causing subtle but persistent building movement.
Historic preservation requirements in Mount Vernon Triangle often mandate traditional mortar materials that may not perform as well as modern alternatives in extreme weather conditions.
Repairing vs. Replacing Your Roof-to-Wall Flashing
Minor mortar joint deterioration can sometimes be addressed with targeted repointing, but widespread failure requires comprehensive repair strategies. The decision depends on joint condition, building age, and extent of water damage.
Spot repairs work for isolated areas where less than 10% of mortar joints show deterioration. These repairs involve removing damaged mortar to a depth of 3/4 inch and replacing it with matching material.
Full repointing becomes necessary when deterioration affects more than 25% of visible joints or when efflorescence indicates widespread moisture problems throughout wall assemblies.
Complete flashing replacement may be required if original installation was improper or if metal components have corroded beyond repair. This involves removing and reinstalling all flashing systems.
| Repair Type | Cost Range | Duration | Best For |
|---|---|---|---|
| Spot Repointing | $500-$1,500 | 1-2 days | Isolated minor deterioration |
| Full Repointing | $3,000-$8,000 | 3-5 days | Widespread joint failure |
| Flashing Replacement | $2,500-$6,000 | 2-4 days | Corroded or improperly installed flashing |
| Complete System Repair | $8,000-$15,000 | 5-7 days | Multiple failure points |
DC Building Code Requirements for Mortar Repairs
Washington DC Municipal Regulations Chapter 12A requires mortar repairs to match original materials in historic districts. This includes using lime-based mortars rather than modern Portland cement mixtures that can damage older brick.
Building Code Section 1405.1 mandates proper flashing installation at all roof-to-wall transitions. Flashings must extend at least 4 inches up vertical surfaces and be properly counter-flashed to prevent water infiltration.
International Building Code Section 1405.4 requires weep holes at 24-inch intervals in masonry veneer systems to allow moisture drainage. These holes prevent water accumulation behind brick walls.
DC Green Building Standards encourage use of materials with low environmental impact. Many mortar repair projects now use recycled content or locally sourced materials to meet sustainability requirements.
Permit requirements vary by project scope. Simple repointing under $2,500 typically doesn’t require permits, but structural repairs or flashing replacement often need approval from the Department of Consumer and Regulatory Affairs.
Preventative Maintenance for Mortar Joints
Regular inspection schedules help identify mortar joint problems before they cause significant damage. Annual inspections during fall allow time for repairs before winter freeze-thaw cycles begin.
Cleaning procedures should use low-pressure washing or gentle brushing rather than high-pressure systems that can damage mortar. Chemical cleaners should be pH-neutral to avoid mortar deterioration.
Sealant application every 5-7 years provides additional protection against water infiltration. Modern breathable sealants allow moisture vapor to escape while preventing liquid water penetration.
Proper drainage management prevents water accumulation near foundation walls. This includes maintaining clean gutters, proper downspout extensions, and grading that slopes away from building foundations.
Vegetation management prevents root damage to mortar joints. Keep shrubs and vines at least 12 inches from exterior walls to allow air circulation and prevent moisture retention.
Choosing the Right Contractor for Mortar Repairs
Mortar repair requires specialized knowledge of historic masonry techniques and modern waterproofing methods. Not all roofing contractors have the expertise needed for proper mortar joint restoration.
Experience with DC historic districts is essential since many Mount Vernon Triangle buildings have specific preservation requirements. Contractors must understand when traditional materials are required versus when modern alternatives are acceptable.
Proper licensing includes both roofing and masonry certifications in DC. This dual expertise ensures contractors understand how roof systems integrate with wall assemblies at critical transition points.
Insurance coverage should include both general liability and workers’ compensation. Mortar repair work often involves ladder work and material handling that creates liability risks.
References from similar projects in Mount Vernon Triangle or other DC historic districts provide evidence of contractor familiarity with local building types and preservation requirements.
Emergency Response for Active Leaks
Active water infiltration requires immediate temporary measures to prevent interior damage. This includes placing collection containers, moving furniture away from affected areas, and protecting valuable items with plastic sheeting.
Temporary exterior protection can include applying waterproof tape over visible cracks or installing temporary flashing patches. These measures provide short-term protection until permanent repairs can be made.
Interior damage assessment should document all affected areas with photos and moisture readings. This documentation helps insurance claims and guides repair priorities.
Emergency tarping may be necessary for severe cases where water is pouring through walls. Professional installation ensures tarps don’t trap moisture against building surfaces.
Priority repair sequencing addresses the most severe leaks first while planning comprehensive solutions for less critical areas. This approach minimizes ongoing damage while working toward permanent fixes.
Long-Term Solutions for Chronic Moisture Problems
Chronic moisture issues often require system-level solutions rather than spot repairs. This may include installing drainage systems, improving ventilation, or upgrading waterproofing membranes.
Exterior waterproofing membranes provide additional protection for buildings with repeated moisture problems. These membranes create a secondary barrier behind masonry walls.
Interior vapor barriers can help manage moisture in buildings where exterior modifications aren’t possible. These barriers prevent moisture from reaching interior finishes while allowing walls to breathe.
Dehumidification systems help control indoor humidity levels in buildings with persistent moisture problems. This prevents mold growth and protects interior finishes from moisture damage.
Regular monitoring with moisture meters helps track problem areas over time. This data guides maintenance schedules and identifies when repairs are needed before visible damage occurs. The Best Flat Roof Maintenance Tips for Petworth Homeowners.
Frequently Asked Questions
How long does mortar joint repair take in Mount Vernon Triangle?
Most mortar repairs take 2-5 days depending on the extent of deterioration. Simple spot repairs can be completed in one day, while full repointing of entire wall sections may require a week. Weather conditions in DC often extend project timelines during winter months.
Can I use regular cement mortar for repairs on my historic row house?
No. DC historic preservation guidelines require matching original materials. Most historic row houses in Mount Vernon Triangle used lime-based mortars that are softer and more breathable than modern Portland cement. Using the wrong mortar can cause brick spalling and accelerate deterioration.
How much does mortar joint repair cost in Washington DC?
Costs vary based on building height, accessibility, and repair scope. Simple spot repairs start around $500, while full repointing projects typically range from $3,000 to $8,000. Historic district requirements may add 15-20% to project costs due to specialized materials and techniques.
Will insurance cover mortar joint repairs?
Standard homeowners insurance typically doesn’t cover normal wear and tear like mortar deterioration. However, if damage results from a covered peril like windstorm or fallen tree, related repairs might be covered. Always document damage and check with your insurance provider.
How can I tell if mortar joints need repair before leaks occur?
Look for hairline cracks wider than 1/8 inch, mortar crumbling when touched, white efflorescence deposits, or gaps where mortar should be. Also check for water stains on interior walls near exterior brick. Annual professional inspections can identify problems before they cause leaks.
Is it normal for mortar joints to deteriorate in DC’s climate?
Yes. DC’s freeze-thaw cycles, high humidity, and urban heat island effects accelerate mortar deterioration compared to more moderate climates. Most mortar joints need attention every 50-70 years, but buildings in Mount Vernon Triangle often require earlier intervention due to environmental stresses.
What’s the difference between repointing and tuckpointing?
Repointing involves removing deteriorated mortar and replacing it with new material of matching composition. Tuckpointing is a decorative technique that creates the appearance of fine joints using contrasting colors. Both involve mortar work, but repointing addresses structural issues while tuckpointing focuses on aesthetics.
Call for Your Free Mount Vernon Triangle Inspection
Don’t wait for water damage to spread through your Mount Vernon Triangle row house. Our team specializes in historic masonry repair and understands the unique challenges of DC’s urban environment. We’ll identify problem areas before they cause expensive interior damage.
Pick up the phone and call (771) 240-3300 today to schedule your free inspection. Our experts will assess your mortar joints, identify potential leak sources, and provide a clear plan for protecting your home from water damage.
Early intervention saves money and prevents the extensive repairs that come from ignoring deteriorating mortar joints. Call (771) 240-3300 now while the weather is still favorable for exterior repairs.
Mount Vernon Triangle’s historic character deserves specialized care. Trust the local experts who understand both the preservation requirements and the technical challenges of maintaining these beautiful old buildings.
Call (771) 240-3300 today to schedule your free inspection and protect your investment from water damage.